
How it works
Our Process
At Clear Air KC, every job across the Kansas City metro starts with the property itself, not a preset package. Before recommending anything, we look at what is actually happening: the visible conditions, where moisture is present, which materials are affected and what led to the problem. We then explain what those findings mean and whether inspection or testing, mold remediation or water damage work is genuinely needed, so you leave with a clear next step and without work the property doesn’t require.
You don’t need to diagnose the problem before you call.
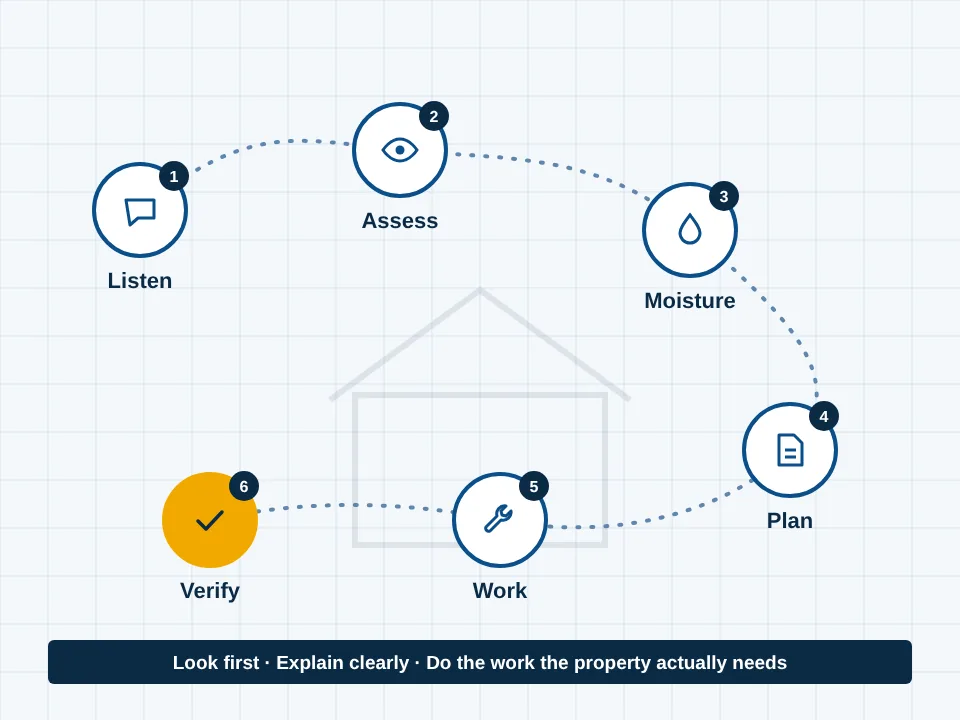
A Clear Process Starts With the Actual Problem
Mold and water problems can look alike from the outside and still need very different responses. A musty room, a visible patch, a slow hidden leak and a flooded floor are not automatically the same job. Everything that follows depends on working out which situation you are actually dealing with.
Look first. Explain clearly. Do the work the property actually needs.
The full sequence
What Happens From the First Contact to the Final Check?
- 01
Tell Us What Happened
A conversation about what you noticed, where, and when it started. It gives us enough context to judge whether a visit makes sense and what to look at first, so nobody arrives guessing.
- 02
Assess the Situation
We look at the affected area and the building around it. The goal is to understand the conditions before anyone recommends a solution, because the same symptom can have very different causes.
- 03
Find the Moisture and Affected Areas
Readings and observation show which materials are wet and how far the problem reaches. This is where hidden extent comes to light and where the likely source is traced.
- 04
Explain the Options
You hear what was observed, what is known, what is still uncertain and what each option involves. Decisions are yours to make, with the facts in front of you.
- 05
Complete the Appropriate Work
Only the work the situation calls for, whether that is drying, targeted removal, full remediation or a simple recommendation you can handle yourself.
- 06
Check the Result
Before the job is considered finished, the area is checked to confirm it is clean and dry and that the moisture source has been dealt with or clearly flagged.
01First contact
1. Tell Us What Happened
You do not need to know the technical name for the problem before contacting us. Describe it in your own words. These details help most:
- What you noticed
- Where it is located
- When it first appeared
- Whether water or moisture was involved
- Whether it has come back before
- Any leak, flood or plumbing event
- Whether the home is being bought or sold
- Basement, crawl space, attic or living area
02On site
2. Assess the Situation
A recommendation is only as good as the understanding behind it. Before choosing a solution, we look at the context the problem sits in. Not every concern needs a formal inspection; sometimes a careful look and a few readings answer the question.
- Visible conditionsWhat can be seen and where.
- Moisture historyPast leaks, floods or dampness.
- Affected areaHow large and how spread out.
- MaterialsDrywall, wood, carpet or insulation.
- LocationBelow grade, attic or living space.
- Water sourceActive, past or seasonal.
- RecurrenceWhether it keeps coming back.
- Hidden areasCavities and spaces worth checking.
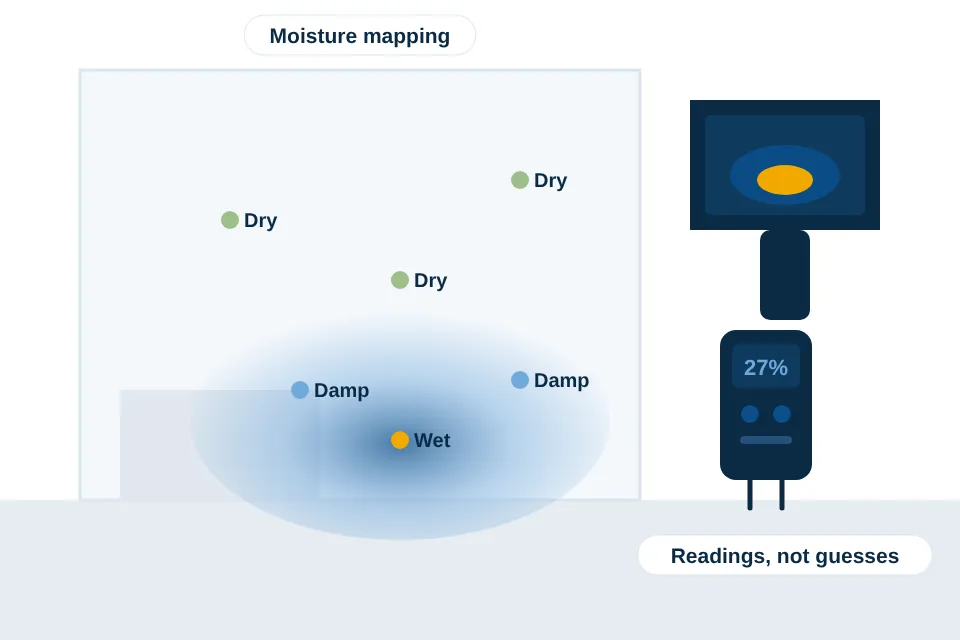
03The core of the process
3. Find the Moisture and Affected Areas
Mold is usually part of a moisture story. Cleaning visible growth without understanding why the area became wet can leave the underlying problem in place. This step uses several tools together:
- Moisture meters
- Readings in walls, floors and framing show what is actually wet, which is often more than what looks wet.
- Visual assessment
- Staining, swelling, peeling paint and odor patterns point to where water travels.
- Moisture mapping
- Readings recorded across an area outline how far moisture has spread.
- Thermal imaging, where appropriate
- Temperature patterns can suggest hidden moisture, confirmed with a meter.
Some sources are obvious; others take more work to trace, and occasionally a source can only be narrowed down rather than pinpointed. When that happens, we tell you so.
04Before any work
4. Explain What We Found
Clear explanations come before work begins. Before any decision, you should understand:
- What was observed
- What is known with confidence
- What remains uncertain
- What testing could and could not answer
- What work may be appropriate
- What happens if the moisture issue is left unresolved
- The practical next step
No one can promise a perfect diagnosis of conditions hidden inside a building. What you can expect is an honest account of the evidence and its limits.
Branch one
When Inspection or Testing Is the Right Next Step
Not every mold concern requires laboratory testing. Inspection looks at the building, visible conditions and moisture. Sampling is useful when it can answer a specific question the inspection alone cannot.
Inspection
Building, visible signs, moisture readings and history.
Testing
Sampling only when it has a defined purpose.
Results
Findings, what they mean and the next step.
Where mold is already visible, the EPA notes that sampling is generally unnecessary, and NIOSH explains there are no health based standards for indoor mold levels. Testing describes the building; it does not tell you whether mold is affecting someone’s health. For health concerns, speak with a qualified healthcare professional.
Branch two
When Mold Removal or Remediation Is Needed
Mold removal means targeted cleaning or removal of affected materials where that is enough. Remediation is a broader, controlled process for larger, hidden or recurring problems. Many jobs are small; a large project is never assumed.
The scope depends on:
- Size of the affected area
- Materials involved
- Location in the building
- The moisture source
- Hidden extent
- Contamination conditions
Branch three
When Water Damage Comes First
When water is active or recent, drying comes before anything else. The sequence usually runs like this:
- Water event
- Wet materials
- Extraction
- Drying
- Monitoring
- Moisture control
- Restoration
Choose a starting point
Where Does Your Situation Fit?
Mold is present
Mold Removal / Remediation
When growth is present and affected materials need to be addressed, the process focuses on containment where appropriate, cleaning or removal, drying and the moisture source.
Our mold remediation approachSomething is uncertain
Inspection / Testing
When the source, extent or presence of mold is unclear, an inspection can establish the conditions. Sampling can be used when it answers a specific question.
Mold inspection and testingWater is the problem
Water Damage Restoration
When water is active or recent, the priority is extraction, drying and moisture control before secondary problems develop.
Water damage restorationInside a remediation job
What Mold Remediation Work Can Involve
- 1
Moisture Assessment
Confirming what is wet and why, so the plan addresses the cause and not only the growth.
- 2
Work Area Preparation
Protecting belongings, flooring and pathways, and planning how materials will leave the building.
- 3
Containment
Plastic barriers around the work area where appropriate, so disturbed particles stay out of clean rooms.
- 4
HEPA Filtration and Airflow
HEPA air filtration and, where appropriate, negative air pressure to capture particles and control airflow.
- 5
Removal or Cleaning
Porous materials with growth that can’t be cleaned are removed; suitable surfaces are cleaned.
- 6
Drying
Bringing materials back to normal moisture levels before anything is sealed or rebuilt.
- 7
Source Control
Correcting, or clearly recommending a fix for, the leak, seepage or humidity behind the growth.
- 8
Final Check
Confirming the area is clean and dry, with post remediation testing only when it serves a purpose.
Inside a water job
What Water Damage Restoration Can Involve
- 1
Identify and Control the Source
Stop or isolate the water first.
- 2
Extract Standing Water
Remove water so drying can begin.
- 3
Map Moisture
Record how far water has traveled.
- 4
Set Drying Equipment
Air movers and dehumidifiers placed for the space.
- 5
Monitor Materials
Repeat readings track progress.
- 6
Confirm Drying
Materials checked against normal levels.
- 7
Address Affected Materials
Remove what can’t be dried or saved.
- 8
Restore Where Applicable
Repairs once the structure is dry.
Full details are on our water damage restoration page.
Restraint is part of the job
A Good Process Also Means Knowing What Not to Do
- We do not treat every visible mold concern as a testing problem.
- We do not assume every moisture issue needs the same scope.
- We do not rely on the color of mold to decide the response.
- We do not close up wet materials before they are adequately dry.
- We do not promise an outcome the property conditions cannot support.
- We do not use technical language when plain language works.
The Standards Behind the Process
- ANSI/IICRC S520
- Standard for Professional Mold Remediation.
- ANSI/IICRC S500
- Standard for Professional Water Damage Restoration.
Clear Air KC follows recognized professional practices, including the applicable IICRC standards for the work being performed.
You Should Know What Was Found and Why
Records turn a verbal explanation into something you can review, compare and share with an insurer, buyer or another contractor. What is documented depends on the job, so not every project includes every item shown here. Ask what you will receive before work starts.
- Moisture readings
- Affected area observations
- Photos when appropriate
- Scope of work
- Work performed
- Conditions observed before and after work
- Drying information when relevant
- Testing reports when testing is performed
When the Situation Deserves a Professional Look
- Mold that keeps coming back
- Moisture you can’t locate
- A larger affected area
- Growth in a crawl space or behind walls
- Significant water damage
- Sewage or contaminated water
- Uncertainty before buying or selling
- Dampness that returns season after season
Why the Process Matters
A process is only useful if it leads to better decisions. Ours rests on four things you can judge for yourself. You can also read about Clear Air KC and the people behind the work.
Experience
Understanding how buildings take on, hold and release water.
Expertise
Choosing assessment and remediation methods that fit the conditions.
Evidence
Readings, observations, documentation and testing when useful.
Trust
Clear explanations and honest next steps, including when less work is the right answer.
Your next step
What Should You Do Next?
IfYou see mold Compare our services or check the areas we cover.
Call to discuss the condition
IfYou smell something musty but can’t find the source
Consider an inspection
IfYou are unsure whether testing is useful
Review the inspection and testing guidance
IfYou have active or recent water damage
Address extraction and drying first
IfYou are preparing to buy or sell a property
Consider whether inspection or testing could answer a specific concern
Process Questions
Guidance referenced: EPA mold guide
Ready to talk through the problem?
You Don’t Need to Know the Right Technical Term
You don’t need to diagnose the issue yourself. Explain what happened, what you’re seeing and what you know about the moisture or water source, and Clear Air KC can help work out the appropriate next step.